

This is the fourth post in my series on the benefits of writing with an outline. In my first post, I listed three reasons why most writers need an outline. In the second, I discussed three things to keep in mind when creating an outline. In the third, I talked about how to use one while drafting. In this post, we’ll get into some of the nuts and bolts of different types of outlines.
Let’s start with the obvious: every book is different. And, also obvious: every writer is different. Slightly less obvious: the method of writing each book will be different. Most writers find a system. Sometimes, books blow up that system. At some point, the method that worked for your last book or your best friend or your favorite writer will fail you. Or you’ll discover a new method. Or you’ll realize you’ve let the character drag you kicking and screaming into a murderous subplot you did-not-see-coming! And no one but other writers understands how this can happen.
At this point, I’m often tempted to quote the Cheshire Cat: “We’re all mad here.”
It is in times like these that an outline can be useful. It’s a bridge from your inspiration to the words on the page. A reminder of where you want the story to go. A map.
But how do you go about making this map? And how could anyone possibly advise anyone else when every book is so darn different? Well, here are four methods for creating an outline; you might find one that works for you.
Outlining Method One: Acts
Do you not like being constrained by an outline? Need to let your story flow like a river, but don’t particularly want to end up drowning in some bog you did-not-see-coming? A simple broad outline might be the best way to go. It won’t get into details. You can discover all the nuances on your own. But it will help keep in mind where the character, the story and their writer are eventually planning to go.
Stories fall into three acts: the beginning (25%), the middle (50%) and the end (25%). Each one of these acts is precipitated by a major event in which the character makes a major decision. For example, take The Lion King. If you were to write a three-act outline for this movie, it would look like this:
- Act One — Simba in the Pridelands
- Break into Act Two — Simba denies his birthright and runs away.
- Act Two — Simba in exile.
- Break into Act Three — Simba decides to go home and reclaim his birthright
- Act Three — Simba returns to the Pridelands to confront Scar
So, we have three sets of scenes, and two decisions. That’s it. The spine of a story. And if you want to discover the details, the minor characters and the setting along the way, that’s all you really need to get going.
Outlining Method Two: Time
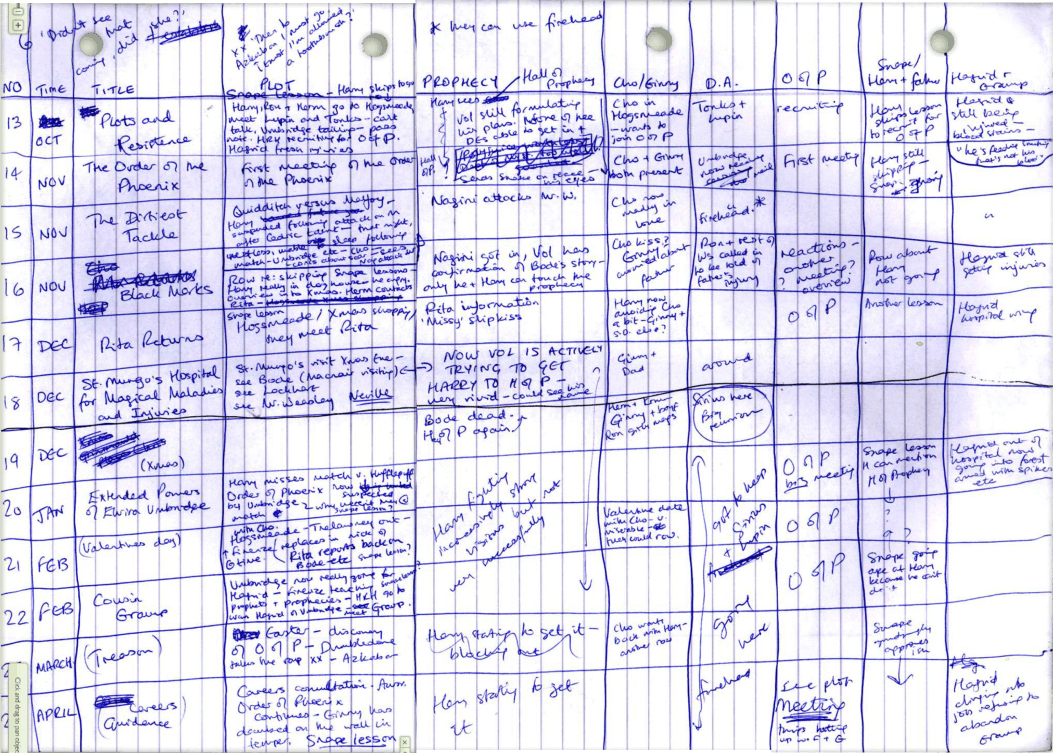
This is an especially useful method if you have a very structural timeline, such as a school-year, a summer, or a season. If the timeline is short enough, you can even make this type of outline on an actual calendar. It’s a fun way to make your book and characters feel real!
One of the most famous examples of this type of outline comes from the ultimate school-year story: Harry Potter. Check out J.K. Rowling’s outline for Harry Potter and the Order of the Phoenix. You’ll see in the far left column that she organized her outline by months
Outlining Method 3: Character
This is a useful way to outline both broad stories with multiple viewpoints, or stories that are not plot-driven. Rather than focusing on events, focus on each character, and outline three major points:
- How the character begins — This is similar, in substance, to an outline of the first act. An introduction to your character. Where is he at the opening of the story? What does he want? Why? And what was his past?
- How the character changes — This is the middle of his story. Something forces him to act, and he begins to change. What skills does he learn? What lessons? What mistakes does he make? Who does he meet?
- How the character ends — The climax. The grand finale. The character should now be able to do something he was not able to do at the beginning. What is it? And how does he show it?
I find it useful to do just a basic outline like this for every single one of my characters. Continuing our Lion King example, consider Pumbaa. He’s the sidekick to the sidekick that only shows up halfway through the movie. But he has an arc. At the beginning, he cowtows to Timon, letting him claim his ideas for his own. Even his name, in Swahili, means “to be foolish, silly, weak-minded, careless, negligent.” And yet Pumbaa is changed and inspired by Simba and Nala. He makes the decision to leave his carefree life and follow Simba to Pride Rock, and in the end leads a charge against the Hyenas. In fact, his arc is bookended by two charges: the first, a senseless “bowling for buzzards,” the second, a purposeful attack in defense of himself and his friends. Comedic relief? Yes. But also a character in his own right.
Making a simple, three-point outline for your main character and the supporting ones will help shape your story. It’s an exercise you can do in an afternoon that might save you heaps of time in the long-run, and your story will be richer for it.
Outlining Method Four: Combine
No one outline method will work for everyone. But, just as there are billions of stories there are . . . well, maybe not billions, but at least hundreds of ways to combine the elements of those stories into an outline that works for you. In my next and final post, I’ll talk about a few different methods of actually writing these outlines down.
 Bess Cozby writes epic stories in expansive worlds from her tiny apartment in New York City. By day, she’s an Editor at Tor Books, and Web Editor for DIY MFA. Her work is represented by Brooks Sherman of the Bent Agency. Tweet her at @besscozby, contact her at bess@diymfa.com, or visit her website at www.besscozby.com.


