
Over the past few months, I’ve shared some 3-Act analyses of various different movies, books, and stories. These analyses have included things like the book Pride and Prejudice, the movie Die Hard, and Kate Chopin’s “The Story of an Hour.” It can be useful to look at examples of the three-act structure in action, but once we’ve got a handle on how the theory works, what do we do with it? How do you apply it to your own writing and get your manuscript organized?
That’s the topic we’re going to tackle today. Since it’s spring, I’ve got spring cleaning on the brain and I thought I’d do a quick rundown on how to go from brainstorming ideas to planning out a concrete story.
This process works best if you have a manuscript started and have at least a few scenes already written. In other words, if you’re a “pantser” (i.e. you write by the seat of your pants) this approach could be a great fit for you. That said, if you’re a “plotter” and you like to pre-plan your story before you write it, you can also use this step-by-step system and use it to plan your story from scratch. And, of course, if you’re a mix of the two extremes, this process is also a great fit for that “plotter-pantser” middle ground.
1) Take an Inventory
If you’re a pantser, and you’ve already written part (or all) of your story, this step will be easy-peasy. Basically, all you have to do is sit down with a blank sheet of paper and make a list of every single scene you’ve written. If you’re a plotter and you haven’t started writing yet, just sketch out the scenes you think your story needs.
As you do this exercise, don’t worry about including a ton of details, just jot down a few words for each scene that will help you identify which scene is which. You also don’t necessarily need to list all the characters for each scene, but in some cases you may want to include initials with the scenes so you remember which key characters are in play.
For example, your list might look something like this:
- Scene with B alone in the park
- Dinner party (B, V, C, P)
- Scene where B shares the bad news with V
- Etc.
Don’t panic if you can’t remember each and every last scene you’ve written (or plan to write) and don’t worry about listing things in order. The goal here is just to do a quick inventory so you get a sense for all the different scenes that are part of your story.
2) Make Scene Cards
Once you’ve taken an inventory of scenes, the best next step is to make scene cards. You can do scene cards with index cards or sticky notes (hooray for office supplies!) or virtually by using a program like Scrivener.
Here’s what I put on each card:
- Scene Name (usually taken directly from the inventory)
- Major Players (just the most important characters)
- What Happens (1-2 sentences max.)
- Setting (when/where the scene takes place)
- Purpose (why is the scene in the story?)
Make cards for scenes you’ve already written as well as scenes you think you might want to write in the future. The reason I love this method is because if you haven’t written all your scenes, you can use the scene cards almost like cue cards: pick one at random, then write that scene.
I personally like index cards the best because I love office supplies and they are the most portable option, but you should use whatever method works best for you. The goal here is for each scene to be its own separate unit (sticky note or index card) so you can move things around.
Some writers like to do a more detailed inventory (or outline) where they list out characters and events for each scene in a more granular way than just a list. If that’s the case, you can just print out your inventory and cut it up so that each scene is a separate piece of paper. Voilá! You’ve got instant scene cards.
3) Lay Out Your Scenes
After making scene cards, lay everything out on a table or other larger surface. The goal is to be able to see the whole story at a glance. The reason for doing this as scene cards (rather than a static outline) is that it allows you to move things around if need be.
Leave the scenes laid out for a couple of days and look at your story from time to time. If any scenes seem out of place, try moving them around to see if they work better somewhere else. Let the story “settle” for a few days before moving on to the next step.
4) Mark the Landmark Scenes
Once you’ve laid out your scene cards, it’s time to mark your story landmarks. This includes the three acts, two pivot points (where the acts transition from one to the next), as well as the midpoint, climax, and denouement. Use sticky notes or a brightly colored pen to mark those key points in your story.
Next, it’s time to consider pacing. How long are each of your acts? On average, Act 1 is usually around 20-25% of the story, Act 2 is 50-60%, and Act 3 is 20-25%. This is not an exact science, of course, and some books might have an Act 2 that is 80% of the entire story while others might be broken up almost into thirds. The goal here is to get an overall sense for where those transition points fall and how long each of the acts are relative to the size of the entire book.
You’ll also want to look carefully at the placement of your midpoint. Usually this point in the story falls right at the halfway mark, give or take a few scenes. Sometimes, though, the midpoint might actually span multiple scenes. For example, in Pride and Prejudice, the midpoint begins with the False Failure and Mr. Darcy’s failed proposal, then spans until Elizabeth reads Mr. Darcy’s letter, and finally culminates with her famous line: “‘Til this moment, I never knew myself.”
In addition to marking the midpoint, you’ll also want to note where the climax falls in your story. Usually, the climax falls around the 85-90% mark, though there is plenty of wiggle room. The key is that the climax must occur somewhere in Act 3 and there should still be a scene (or two or more) following it as part of the closure that follows. You don’t want the climax to be the absolute last scene because the story may feel truncated. You want to make sure you leave room for that “sigh of relief” that is the denouement.
5) Map Out Your Story
By the time you reach this point in the process, you should have a pretty good idea of the shape of your story and how everything fits together. Still, if you’re a visual person (like me) you may want to take this one step further and draw a story map. To map out your story you must first identify the Major Dramatic Question (MDQ), which is the main question that drives the primary thread of your story forward. You’ll also want to identify 1-3 Lesser Dramatic Questions (LDQs), which are questions that drive the subplots. Once you have the MDQ and LDQs identified, assign each thread a color and mark the scenes that belong to that thread with a dot in that color pen.
For example, if we were doing this exercise with The Hunger Games we might say the main thread of the story (“Will Katniss survive the games?”) is orange, while the subplots might be blue and pink. Then we mark the scenes with a dot indicating whether they belong to a particular thread. For instance, the Reaping scene, which belongs to all three threads, would have dots in each color: orange, pink, and blue. If a scene does not have any dots on it, then you need to consider seriously whether that scene belongs in the story at all, since it doesn’t contribute to any of the story threads.
After you’ve identified which thread(s) each scene belongs to, you can map your story out like a subway map. Each scene is represented by a stop on the map and each thread is a subway line. The “local stops” are scenes that only appear in one story thread, while the “express stops” are scenes that appear as intersections between two or more threads. You can map out your story like a subway, like this example from The Hunger Games. It might look something like this:
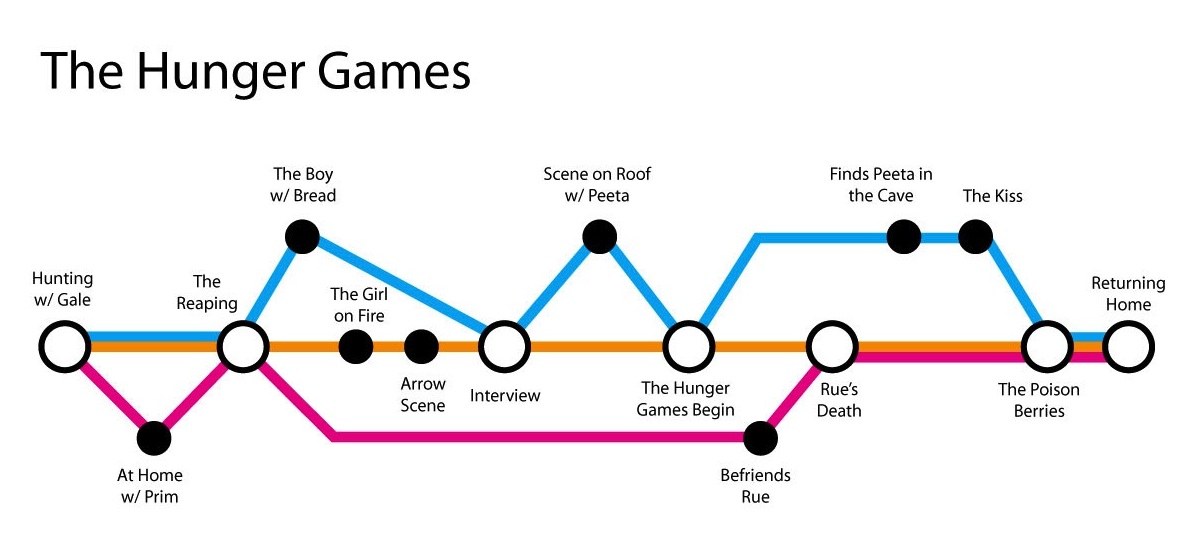
Why do we map out our stories in this way? Aside from making a pretty diagram, what’s the point? The reason we do this is because once you’ve mapped out your story, you can separate out the subway lines and look at each story thread individually. This allows you to make sure whether there are any places where a particular thread sags. When we tease apart the three threads in The Hunger Games map, we get something that looks like this:

As we can see, in the pink line there is a long gap where there are no scenes. Now, in the case of this particular story, it works because that stretch of the story is when Katniss is training for the Games and then the first part when she is in the Arena. For that section of the book, it makes sense that she’s not focusing on her family because her own survival is front and center. It’s only later in Act 2 of the story, where she connects with Rue, that the family story thread becomes more important.
What’s the purpose of this exercise? When we tease apart our story threads, we can see if there are places where a bunch of scenes lump together or if there is a long gap between scenes. Once we identify those places, we can make an informed, artistic decision. It’s possible that we decide to leave it exactly as is because it works for the story… and that’s okay. But the point is that this becomes an intentional choice, rather than a haphazard outcome that “just happened that way.”
Instinct to Intention
At DIY MFA, we talk a lot about making the shift from instinct to intention. If you’re part of our word nerd community, you’ve already got good instincts. I say this with confidence because I know that DIY MFA attracts writers like you, who are dedicated to learning the craft and becoming the best writers they can be.
But instincts alone are not enough. We can write stories on instinct alone, but that would make our process random. Sometimes, we’d get it “right” and other times we might miss the mark. But once we take the time to understand what’s going on in our story and really analyze the breakdown of all the parts, we can start to make intentional choices.
When we shift from instinct to intention, our process goes from random to precise. We are no longer making decisions through trial and error. Nothing in our book will be there by accident, but because we consciously put it there. This gives us artistic control over the outcome and allows us to make our book the best it can possibly be.
There you have it: a step-by-step process to help you get your manuscript organized. You can use this process whether you are a “plotter” and you like to pre-plan every detail of your book, or if you are a “pantser” and you write by the seat of your pants. The goal of this method is not to pigeonhole you or impose a set structure and squash the life out of your story. Rather, the purpose of this exercise is for you to gain clarity on what you’re already doing so you can make intentional choices about your book.
Until next time, keep writing and keep being awesome!

P.S. For more info on Gabriela Pereira, the founder and instigator of DIY MFA, check out her profile page.


